Archive | Beauty RSS feed for this section

Book Review: The Wah Nails Book of Nail Art

4 Jun

Nail art is huge at the moment, even royalty are doing it (Princess Eugenie had Union Jacks on her fingernails at the Epsom Derby on Saturday!) but who better to bring out a book on the subject but Sharmadean Ried, the founder of WAH Nails.

Sharmadean opened her first WAH Nails salon in Dalston in London in 2009 and the brand’s popularity soon caught the eye of national retailers, leading to a pop up shop in Selfridges and a permanent space in the Oxford Street branch of Top Shop.

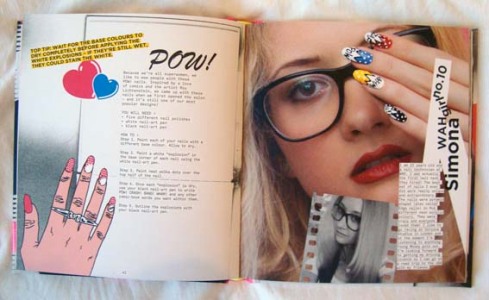
The book takes the WAH style and shows you how to do it yourself. There are 25 projects, starting with their original leopard print design, each with a step by step illustration.

This comic book style is one of my favourites.

The cover gives the impression that the book is aimed at teens but the design inside is a funky scrapbook style which I think has wider appeal. I’m dying to give some of the projects a go but need to invest in some nail-art pens to do the more intricate parts of design. I’ll share the results when I do.

The WAH Nails Book of Nail Art is a very cool book which teaches you the WAH techniques and designs and gives you the inspiration to start doing your own nail art.

Thank you to the publisher @hardiegrantuk for sending us a copy.

Making organic soap

21 Jan

Making your own soap from scratch is possible but very complicated. To get me started I got a soap making kit for Christmas so I gave it a go during my week off last week. The kit makes it incredibly easy, you just melt the soap supplied in the kit and add the different seeds and scent that are also in the kit.

Pour into the moulds provided, leave to set in the fridge and they’re ready. This kit came with a lemon scent and three types of seeds but the more exciting bit is thinking what else you could add. When I make the next lot I’m going to add dried lavender flowers and oil and try some with orange peel and crushed cloves. The kit also suggests adding oats to create an exfoliating soap.

So easy and they will make great gifts but I will still look into making my own from scratch another time.

Christmas Shopping

20 Dec

This year I’m feeling a bit smug about my Christmas preparation as I put £20 away each month this year to fund presents. But I’ve got lots of people to buy for so need to be canny and I know that home made presents won’t cut the mustard with my family! My top tip is the usual one – use your contacts. Any friend with a discount card or cash and carry membership is worth going on a shopping trip with!

If you haven’t finished your present shopping this year here are a few bargains I’ve spotted while buying for my family and friends.

Boots – their now traditional 3 for 2 on gifts is back on and there are so many items in it that it’s almost impossible to not find it useful. If you don’t need three of that type of gift for Christmas – toiletries and make up mainly – then it’s worth buying them to save for birthday presents throughout the year.

My best pick at Boots until Thursday is their Soap and Glory gift set which normally retails at £60 but is only £25 at the moment. While stocks last…

M&S are also doing a 3 for 2 Mix and Match deal and they have 25% off everything in their Cashmere Shop. Plus their gift wrapping paper is 50% off at the moment.

For stocking fillers and Secret Santa gifts Tiger is a great shop to visit. They have toys, toiletries, home ware and electrical products (plus essentials such as batteries and shoe polish). At the moment in the UK they’re only in London and the south but hopefully they’ll spread out soon.

Urban Outfitters have discounts on lots of their festive products offering up to 60% off some lines. I love this cake stand which is now only £5.

Waiting for Boxing Day sales is almost a thing of the past so keep your eyes open for sales already on and if you’re a student don’t forget your student discount is available to use in lots of high street shops.

Nail Art – Marbled Nails

4 Oct

Katie spotted a great nail art method on Pintrest and suggested I give it a try. You need all these items: choice of colours of nail polish, remover, cotton buds and pads, toothpicks and a small bowl full of cold water. I cut the bottom off a plastic bottle as I was worried that the polish would stain a bowl and I was right!

Drip drops of polish onto the surface of the water where it will float and spread out.

With a toothpick gently manipulate the polish to create the pattern. Be really delicate as otherwise the polish will stick to the toothpick when you take it out. Then dip your nail into the water. I couldn’t do it without getting my finger covered with it too but then I just cleaned around the nail with cotton buds and remover.

Newspaper nails

28 Aug

I saw this on Perri Lewis‘s fabulous craft blog and had to give it a try. The instructions actually come from Top Shop’s Inside Out blog
but I’ve seen it on other sites too. Top Shop recommend using surgical spirit which I used and worked a treat. I’ve seen other sites suggest rubbing alcohol or vodka. I haven’t tried them but have seen people comment that it doesn’t work as well.

Here’s what I did. Using the free grey nail polish from this month’s Elle magazine (I love their email newsletter and website by the way) I painted my nails as usual and waited for them to dry.

Then I cut out small pieces of newspaper text and poured surgical spirit into the cap of the bottle. I carefully dipped one nail at a time into the spirit and pressed a piece of newspaper onto the nail, holding it for a few seconds before peeling off, a bit like applying a temporary tattoo.  Add a top coat to seal it and voila!


I also tried transferring pictures but it wasn’t very successful. Of the four judges from X-Factor only Louis Walsh came out well!

PS My boyfriend told me I’m ‘too old’ for these nails but what does he know?!

Wedding Belle

14 Aug

Weddings = expensive. You don’t need me to tell you that. I haven’t had a wedding myself but when talking to friends about the costs I am frequently horrified. Yesterday I went to the wedding of my lovely friend Zoe and she found a few ways to make it more affordable without feeling she’d missed out on all the things she wanted to make it a special day.

One tip I’m going to take away from it is get a taxi rather than hire a car. Everyone’s in the church/registry office/venue when the bride arrives so hardly anyone sees it anyway! But the real reason I’m writing about this here is that instead of paying a hairdresser and make-up artist, Zoe let me loose on her hair and face. Here are my tips if you want to save a few quid.

Firstly, decide if you want to do your own or you want to ask a friend to do it for you. I put make-up on every day and enjoy doing it so I might choose to do my own with some new products to make it feel special. You’re still spending money but you get to keep and use some nice new make-up after the big day.

Secondly, book yourself one or two appointments at make-up counters in department stores. Choose brands you might not normally go for as you could find a new product you wouldn’t have considered before. Take your friend with you and watch carefully as the make up artist applies the make-up. Don’t feel you need to buy everything they suggest but things like primer and a decent foundation or tinted moisturiser are worth spending a little extra on as they are more likely to last the day and evening.

Once you’ve worked out what look you want and have collected the products you need to do at least two trials. Zoe and I did one about three months before her wedding and a second three weeks before. Take photos and make notes when you’re happy with the look and most importantly – time it! We did Zoe’s look in two hours.

Zoe wanted a natural look because she doesn’t wear make-up on a day to day basis and with her pale colouring it would be easy to over do it. With some Laura Mercier primer, tinted moisturiser and loose powder her base was done easily and quickly. On her eyes I used eye make-up primer by Benefit, a pale beige all over her eyelid up to the brow, pale shimmery gold from L’Oreal over the lid and shaded the outside corners with a mid brown. I carefully smudged a brown eye pencil between her upper lashes and finished with a slick of mascara.

Done. Well as far as Zoe was concerned! I couldn’t resist some pale coral blusher and a shimmery highlight in a crescent shape from her brow bone to cheek bone, both from Benefit. Finally we added a natural shade of lipstick from Laura Mercier.

Initially we planned to leave her hair down with a soft wave. I applied Charles Worthington Blow Dry spray and combed through. I then blow dried a section at a time with a round brush and put each section into a bendy foam roller. After letting the hair cool and set I loosely teased it out with my fingers and added some serum and shine spray. This was at our first trial.

At the second trial, spur of the moment inspiration struck and after repeating the steps above, I gathered it up loosely with pins and clips and we had our look. Zoe bought some pearls and flowers on hair grips from Hair We Go that we added on the day to complement her jewellery.


And this is how she looked!