Archive | Home RSS feed for this section

Happy Jubilee!

3 Jun

Happy Jubilee weekend! We hope you’re having a brilliant time and enjoying the bank holiday. A big hello to everyone visiting us thanks to Mollie Makes – we’re so excited to be featured – can’t wait to pick up a copy later on this week! We’re also taking part in BYW 2.0 – Great to meet so many new people through the forums there!

I am going to be baking a cake on Tuesday for lunch with Hannah and my parents and I thought I would share these amazing cake toppings, even though the cake is not baked yet.

I spotted them on Pinterest and my friend Laura ordered a set for me and a set for her from a tiny little shop in her home town. How cute are they!? I couldn’t wait until the cake was baked to share them…

They are sitting on one of my two Emma Bridgewater Jubilee tea towels – both my mum and my future mother-in-law bought one for me – luckily they are both different. I love them!

The weather isn’t quite living up to all of my dreams today, but I’m certainly still planning to have a good time – what are you doing over the bank holiday?

Upcycling a Footstool

1 Jun

Ages ago Katie kindly gave me this lovely footstool that once belonged to her grandmother. I’d been looking for one to do up for a while and this was exactly what I’d been looking for. It’s already been well used in my house but I finally got round to doing it up.

I started by stripping off all the old fabric and padding and giving the whole thing a good clean. I found fabric I liked in Fabrics Galore (Wandsworth Road, London) and wadding in The Crafty Sewer in Tooting.

I cut the wadding to size and lightly secured it on the footstool top with glue. Then I wrapped the fabric around it and got out the trusty staple gun. Halfway through it was obvious that the wadding wasn’t up to the job so I cut a second piece and layered them together. I’m still not completely happy though so any tips from furniture restorers on where to find proper wadding would be much appreciated. It does the job well enough for now though so I finished stapling the fabric securely round the top with a firm even stretch across the top.

I wanted to keep it dark wood but freshen it up, so the next step was to give the wooden base a good sand and a new coat of varnish. This was more difficult than I thought because some of the vanish came off easily and other parts were more difficult so it too a lot of elbow grease to get an even tone. You can still see the grain but I like that.

Two coats of varnish and the footstool is finished. Thank you Katie!

Cheerful carnations

18 May

Carnations get a bad rep. They are mostly known for being the flowers that people buy when they are desperate – wilting flowers from the petrol garage bought in a fit of “SHIT I HAVEN’T GOT THEM ANYTHING”.

But is that association really fair? Traditionally they represent love and fascination, and although they are generally cheaper and a bit smaller than roses, they are still beautiful and come in a huge variety of colours and even patterns. For me the lower price just means they are more affordable and the fact that they are available everywhere means you have no excuse for not having fresh flowers at home!

P and I have been thinking about how we want to arrange our wedding flowers and carnations proved a great flower to test with. We aren’t likely to be using them on the day, as we are looking at wilder flora like heather and ferns, but we wanted to test how our cordial/passata/olive bottles/vases would look with some kind of flower arrangement in them. I hope you agree, they really do look lovely!

2 bunches for £5 from Marks and Spencer

Arranging flowers in the kitchen

Two bunches provides more than enough flowers to fill four bottles/vases – I could probably have filled five for just £5!

How do you think the vases look? I am thinking of dipping them in creamy paint so that just the water level is painted. But I’m worried about how much it will drip! Have you done this before? Any tips, let me know in the comments…

And what do you think of carnations generally? Take the poll over on our Facebook page.

(PS! That’s passata, cordial, olives, passata up there – they make great vases and cost nothing as we ate the previous occupiers…)

Shoe Organisation Inspiration

6 May

I love my bedroom but I don’t have nearly enough storage for my clothes and shoes so it’s a battle to keep it tidy. My current mission is to find something to store shoes in, other than a pile behind the door. Here is some inspiration I found on the internet.

I love this colour wheel of shoes but it does rather rely on you having lots of different plain coloured shoes to have the most impact.

I wish I had room for a gorgeous cabinet like this.

I want everything in this picture.

If you love your trainers and want to show off the labels.

And finally, if your shoes are a bit scuffed and scruffy file them away in this Ikea cabinet.

IKEA hack: bottom up blinds

12 Apr

The windows in the front room of our flat are huge. They let in loads of light and were one of the biggest selling points about the flat when we bought it. BUT there are two problems with having such big windows. 1) The room is south facing, meaning that when the sun is out it looks glorious but the heat soon becomes unbearable – like living in a giant greenhouse. 2) We live on the first floor and without blinds, everyone from the street can see straight in to the room.

The other problem is that only one window currently opens, and that opens from the top down, meaning that having curtains or regular blinds would prevent us from being able to open the window. We needed a solution that would allow us to open the window, let light in, protect us from heat and stop people from being able to look in at us from the street.

Our first solution was this:

Effective, but not particularly attractive, I think you'll agree!

I have to admit, I had no part in the clever solution we now have in place. P can take 100% credit for the idea and execution. When I say ‘we’, I really mean ‘he’. But I was there watching and drinking my cup of tea, so that counts, right?

First of all,we secured large picture D rings to the top corner of each window. Then, we screwed in bronze cleats (think a very small version of the thing you use to secure a boat to a jetty using ropes) to either side of each window, approximately in the middle vertically. These two together were the basis for the pulley system we created.

P securing the cleats

We bought some cheap, very simple blinds from Ikea for £45 and spent another £3.50 on some basic, quite hideous, curtain rods.

We cut the rods so that they were the length of the blind, completely covered by the fabric. Then we created small holes just underneath the rod on each side of the blind. A piece of 3.5m long nylon cord was fed through the hole and secured with a tight knot.

Next, the cord was strung up through the picture rings and pulled down to the cleats. We can now pull the nylon cord to raise the blind, or give it slack to lower it. When it reaches the height we want to set it at, the cord gets wound around the cleat to secure it in place. The length of the blind can then be adjusted at the bottom, by rolling it up or down, making sure that the window is covered no matter what height you set it at.

Hoorah! Adjustable blinds mean people on the street can't peep into our windows anymore!

In total, we probably spent just under £80 on the blinds, curtain rods, cord and fixings. Once the materials were bought this project took about two hours from start to finish. Considering that the quote we had had for bottom up blinds was almost £600 for these three windows, I would call that a massive win.

Book review: A Girl’s Guide to Decorating

27 Mar

Abigail Ahern is an interior decorator and, I just found out by Googling, the star of a new show on Channel 4 which I will definitely watching on 4OD! She has a really cute blog and an online store (although that’s not the most user friendly site I’ve ever visited) AND she has just released a book, which I was lucky enough to get a copy of.

The great part about A Girl’s Guide to Decorating is that, as well as being full of inspirational pictures, there is also real, practical advice. One of the things I worried about when we moved into our new flat was that I wouldn’t be very good at the practical things. Painting I can do, but what about drilling holes and hammering stuff? That seemed way out of my grasp. I’ve learned through doing (after essentially being forced to help by P!)  that most stuff isn’t that hard, and this book is a great book for anyone who is worried about where to begin.

There are also really great ‘room analysis’ pages, where Abigail looks at why certain elements work in a room and what brings pieces together.

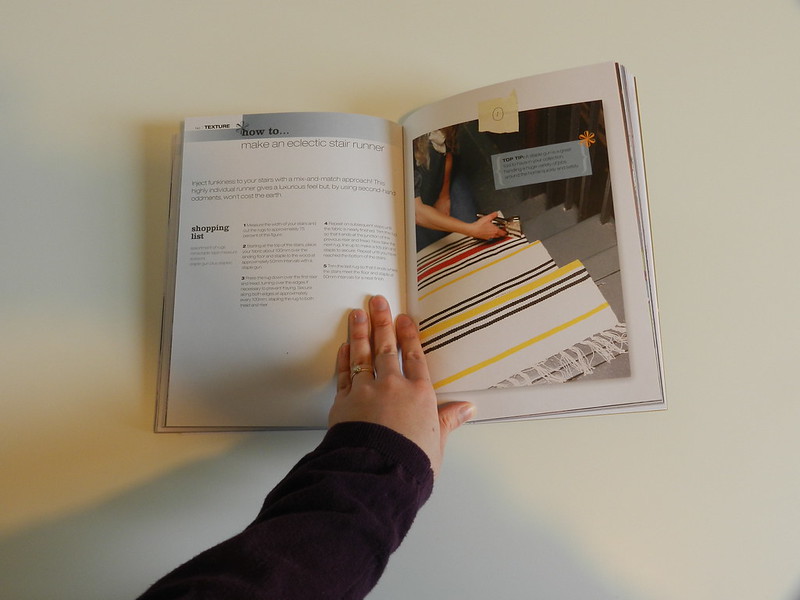
And there are some fun DIY pieces, including this, which I really want to try out – on how to make your own stair runner:

I will definitely be looking out for Abigail in the future! Looking forward to watching her show this week! Thanks to Quadrille for sending me a copy for review. You can pick the book up on Amazon here.

Book review: Design*Sponge at Home

15 Mar

I don’t think I have ever put as many bookmarks into a book as I have with this one. Design*Sponge at Home is from the incredibly talented Grace Bonney, who runs the Design*Sponge website. It’s a great site, full of peeks into people’s homes, step by step DIY tutorials, food and more.  The book is really fantastic. I first read it and marked it up around a month ago, and now, flipping through it I feel inspired all over again!  Some of my favourite pages and ideas below.

I love this apartment – such a lovely combination of vintage pieces – I love the metal wire chair with pink seat and the mirror next to the bed.

How great is the fabric on the right hand side? I would love to have that in my home, maybe as a throw on the sofa or as a rug.

Again, this is such a great home – the leafy curtains, yellow sofas, and gorgeous rug are all just perfect. I wish Anthropologie UK sold the rug here but unfortunately it looks as though it hasn’t make it to the UK yet…

A really simple, but really beautiful, DIY project – using bleach to create gorgeous tea towels (plus this would work on other fabrics too if you wanted to create your own pattern for a skirt or dress, for example).

I had been looking for a salvages chair to do something similar with my never-ending suitcase project but it was not to be. BUT I have found another solution so one day I promise I will actually finish the thing and blog about it…

Look at these amazing before and after projects! I used to have a desk like that!

Again, some amazing DIY projects – the suitcase is obviously dear to my heart, but the IKEA hack is amazing – those dressers are so cheap – who knew you could make one look so good?

To be honest, I wanted to take a photograph of every page in the book and post it up but that would have been very time consuming and pretty illegal. If you are looking for a book to inspire your home design and a few crafty DIY ideas, it is definitely worth a read.

Buy Design*Sponge at Home from Amazon.

Getting organised: the pantry

12 Mar

I cook a lot, as does my fiance. But when we moved in, rather than thinking about what goes with what in the store cupboard and how we should arrange things, we just shoved everything into the cupboard and hoped for the best. It has not been great.

The quickest way to save money when you are shopping is to know what you already have before you go out. We clearly have not been doing this. Below, please find a slightly embarassing photograph of most of the contents of our food cupboards..

Yes, we do have about 50 kg of Basmati rice, EIGHTEEN eggs, three packets of pine nuts (only two are photographed, but we found another one later), and enough crackers to feed a platoon. Yes, we have EIGHT cans of tomatoes and five cans or jars of anchovies. There are also six packets of salt in varying containers. This photograph also does not contain all the varying types of flour and the enormous bag of sugar I accidentally bought online thinking I was getting a small bag.

The Mayans might have believed the world would end this year, but I didn’t think I did until we laid everything out like this.

After taking stock of what we had and putting everything bag in much more logical places (tins of tomatoes with tins of tomatoes, for example, revolutionary), I am going to try much harder to check that cupboard before I go shopping. Fewer duplicates should result in a much cleaner, more organised cupboard and hopefully a neater, prettier kitchen too.

If only it could stay like this – our kitchen all tidied away…

Quick tip: sorting out tupperware

8 Mar

As part of our project to get our flat organised, I found a great tip on Pinterest via The Kitchn. To help store your tupperware, use old CD storage racks to store the lids! That way you can always FIND the lid (which drives me round the bend) and the boxes themselves stack fairly easily.

We had been storing the tupperware under the sink, but it is apparent that we have a mouse, so that was definitely no longer viable. Also everything was in a big IKEA bag, and finding things was a nightmare. This is a great solution and doesn’t take up that much room.  I didn’t have any CD storage racks, but I got one for only a few quid on Amazon. Thanks The Kitchn!

Decorating With Your Own Art

5 Mar

I rent my flat and so have little control over the decor. However I have tried to make it as personal as I can by using my own soft furnishings and furniture etc.

In a previous flat I was allowed to paint my room and chose a strong pink for two of the walls. When I moved I had a little paint left over so I made this painting from a canvas that had been thrown out on the street. I mixed some of it with a bit of white acrylic. It’s loosely my version of a Rothko and was very easy to do with a 1 1/2″ DIY paintbrush.

With my pink curtains, a throw on the bed and other details here and there to pick out the colour I think the painting really brings the room together and makes it feel my own.

If you’re looking for a canvas, which can be expensive, another place I picked up a couple was in the sale at a big DIY store. The paintings on them weren’t to my taste so I painted over them with white emulsion and started again. Of course if you’re handy with a saw, hammer and nails you can buy some 2 x 1″ wood and a piece of calico fabric and make your own frame, stretching the calico over the frame and securing on the underside with a staple gun.